Sunday, December 31, 2006

As 2006 fades...

It's an exciting New Year's Eve at the Bizarre household!

Okay, not really. I'm sick with a chest cold and Kevin is working seatings at the restaurant tonight. Munchkin and I are trying to work up the energy to maybe possibly bake something but that ain't looking so good right now.

The first seating is at 5 tonight; Kevin and the rest of the crew have been prepping for it all afternoon. At 4:30, he came barreling into the house wide-eyed and panting. "We have an emergency!" he bellowed.

After determining that no one was hurt and nothing was on fire, I successfully got my heart rate under control. "I broke our piping bag. I don't know my own strength. Do you have one? I have to pipe goat cheese!" he finally managed.

Do I have a piping bag. HA! I have a tool box full of decorating gear.
With Munchkin's help - because she's my sous chef, don't forget! - we found him a bag and a star tip from my "backup gear" (read: not as nice as my Wilton stuff) and waved as he ran back out the door.

You get used to things like this when the chef lives a few minutes' walk from the restaurant.

Now that I've saved New Year's Eve, I think Munchkin and I will spend the next 7 hours or so eating junk food and having fun. With any luck, Kevin will make it home before midnight so the three of us can ring in 2007 in high style!


Thursday, December 28, 2006

Kitchenmas!

It was a Christmas of kitchenstuff here at the Bizarre household. Even Munchkin was included as, amongst her piles of toys, she found her very own set of "sous chef gear," which is about the cutest thing I've ever seen.


We grownups got toys more suited to our tastes, though. While we like horsies and coloring books just fine, both Kevin and I much prefer things we can play with in a culinary sense. And, as I've said before, I'm a gadget freak.


I spent an hour today rearranging my cake decorating kit. I had to, because under the tree I found a new cake comb, new cake boards, and like 50 new decorating tips. I'm not sure who was more excited about the tips - Munchkin or me. We both flailed a bit and went "ooh ooh!!"

I have yet to sort through the large bag stuffed full of utensils. We've got spoons and spatulas, chopsticks and a candy thermometer, and lots of things made of silicone.

There's a stack of tea towels, a stack of dishcloths (which my mom made for me, by the by. Did your mom make you dishcloths??), and a sweet oven mitt. I love oven mitts.

A bag of basmati rice is currently next to the box with the bread dipping kit. That's fairly close to another bag full of different oils, preserves, jams, and other gourmet edibles.

A new set of Pyrex - oh how I love Pyrex.
A George Foreman Grill - I love these too, no matter what purists may say. We live in an apartment so there are no "real" grills allowed. Besides, I can't make a good grilled cheese sandwich to save my life, and with a little help from my friend George I can have unburnt tasty grilled cheese.
The slicer/shredder attachment for our Kitchenaid. I'm thinking of making a carrot cake so I can use this and some of my new decorating tips for the same project. Mmmmm carrot cake...

Then there's the set of porcelain tableware from Kevin. We weren't planning on gifts for each other this year, but I'd been eying the set for a bit and when we happened across it on sale...well, we got some new plates and dishes.

The best gift of the season was pretty easy to choose, though.
Christmas Day Kevin and I opened the hand-decorated coffee mugs that Munchkin made for us. She pointed out that I could drink my tea from it, and since Daddy likes to get coffee from Wawa he could take his mug there and fill it up.
I did indeed fill my mug with hot tea, and while we haven't stopped by Wawa yet, Kevin will most certainly be using his as well.


Wednesday, December 27, 2006

Cheater's Pumpernickel


People seem to either love or hate pumpernickel bread. For those who love it, it isn't always the easiest thing to make at home. Traditionally, pumpernickel gets its characteristic deep brown color and complex flavor from a long, slow, steamy cooking process and requires a full 24 hours just to bake. The more updated version uses a sourdough starter for flavor and some rather unexpected ingredients to achieve the dark color.


An even more updated - or streamlined, if you will - version eschews the starter and instead relies on an extra rise and a few other changes to get the taste and color we pumpernickel lovers love. After all the hustle and stress of Christmas, I wanted bread and I wanted it tonight.

So I cheated. I mean...I streamlined the process.

Cheater's Pumpernickel Bread
Based on a recipe from Southern Living
Makes 2 loaves

1 T + 2 t active dry yeast
1 1/2 cup warm water
1 t sugar
Combine the above in your mixing bowl and allow to sit at room temperature until the mixture froths and bubbles - about 10 minutes.

Add:
1/3 cup blackstrap molasses
1 T caraway seeds
1 T salt
2 T shortening
2 1/2 cups rye flour
1/4 cup cornmeal
1/4 cup unsweetened cocoa powder

Mix well until incorporated.
Add 1 1/2 cups of bread flour and mix until combined. Add 1/2 - 1 cup additional bread flour, 1 tablespoon at a time, until the dough is stiff, slightly sticky, and cohesive.

Knead 10 minutes in a mixer or 15-20 minutes by hand, until dough is supple and springy.

Form the dough into a ball and place in a lightly greased large bowl, turning to coat. Cover with plastic wrap or a clean cotton towel and let rise until doubled, about 1 hour.
Gently deflate the dough and knead it once or twice. Form it into a ball again and return to your bowl. Cover and let it rise again until doubled, about 45 minutes.
Deflate the dough one last time and divide it in half. Form into two loaves - either freeform rounds or ovals, or into loaf pans. Cover the loaves and let them proof - away from the oven - once more until doubled, about 1 hour.

While the formed loaves proof, preheat your oven to 375*. Once the loaves have doubled, mist them with water and then bake for 25-30 minutes, until they sound hollow when tapped.

Cool and enjoy!!


A note about bread flour

In most bread recipes, bread flour and all purpose flour can be interchanged. Be aware that the two produce different results, though. AP flour will give you a more delicate structure and slightly less height, but your breads will definitely hold up. Meanwhile, bread flour contains the highest percentage of protein which will give your breads that airy, lofty lift we all think of when we think of bread.

If you're just going to make a loaf or two of bread, don't worry about buying an extra bag of bread flour; just use the AP flour you probably already have in your pantry. If you plan to turn out loaves more frequently, though, it would be a good idea to get yourself some bread flour.

When looking at bread flour, get the best you possibly can. Both Pillsbury and Gold Medal make fine bread flours, but if you want to go all-out, get you some King Arthur flour. I swear by King Arthur's Sir Lancelot hi-gluten flour to the degree that I have a 50lb bag of it in my kitchen, however SL isn't always easy to find. If you can get your hands on some Sir Lancelot, grab it up and guard your source. I have to get mine through the restaurant Kevin works at; they special order it for me through a food distributor. I'll never use a different brand, though, because the results I get from KASL are absolutely unparalleled.

By the way...
never use cake (or soft) flour when baking bread. It doesn't have enough protein to support the structure of the bread and you'll find yourself with sad, fallen loaves.


Monday, December 25, 2006

Merry Cheesecake to All!

Just a quick note to wish everyone a wonderful holiday season!

I ate what is perhaps the most interesting, wonderful combination of flavors at the dinner party we attended Christmas Eve. I offered to bring an appetizer after seeing this gastronomical giant posted in another blog, and I've never been so pleased about a food choice.

This lovely thing you see is a Blue Cheese Cheesecake from CulinaryConcoctionsByPeabody.com.


Seriously, folks. It's amazing. Absolutely, astoundingly amazing. We couldn't stop eating it and damn near ruined our dinner of prime rib. It's got the creamy consistency we all know and love when it comes to cheesecake, but the blend of cheeses make for an interesting mix of mellow saltiness and a tiny bit of "kick" from the blue cheese - I found a lovely strong Danish blue with all the taste but none of the stink. Kevin doesn't like blue cheese and he tore into this thing. The blue isn't overpowering; it provides a background note and enough tang to make things interesting. Blue cheese fans will love it and blue cheese haters may well start to change their tune after eating a few bites.

It's topped with an onion-pear chutney that I've now deemed the best thing I've ever eaten in my life. I'll be making this in mass quantities and eating it with roasted chicken, on hamburgers, over ice cream - maybe just straight from a bowl. It's sweet but not overly sweet. It's tangy from the vinegar. It's savory from the onion. It is perfection.

We served it with an assortment of crackers, pita chips, and some lightly toasted brown bread. If I had to choose a favorite accompaniment, it would be the brown bread - but the wheat crackers were delicious too.

Blue Cheese Cheesecake
makes 1 9" cheesecake

1 3/4lbs cream cheese, at room temperature
4oz shredded Asiago cheese
4oz shredded Monterey Jack cheese
8oz blue cheese, crumbled
5 large eggs
1/3 cup heavy cream
1/4 t pepper

Grease an 8" or 9" springform pan and preheat oven to 350*.
Cream together the cheeses until smooth. Add the eggs one at a time, fully incorporating each before adding another.
Add cream and pepper, mixing well.
Pour into the springform pan.

Place pan inside a larger flat pan - like a roasting pan. Add hot water to the larger pan so it comes halfway up the springform pan.
If you already know what I'm talking about - bake it in a water bath.

Bake uncovered at 350* for 45-50 minutes, or until the top is golden brown and the center is set and non-jiggly.

Top with Pear-Onion chutney (below) and serve with crackers or bread.

Pear-Onion Chutney

4 cups onions, diced
2 cups pears, cored and diced (you can peel if you want, but I like them better with the peels on)
1 t olive oil
pinch of sugar
2 T balsamic vinegar
1 cup brown sugar, packed
1/4 t salt
Several grinds of pepper

Over medium-low heat, saute the onions in the olive oil with a pinch of sugar until brown and caramelized.
Add the pears and stir gently to coat.
Add the rest of the ingredients, stirring gently. Cook until the pears are tender.
Using a slotted spoon, remove the pears and onions to a separate bowl. Continue simmering the liquid until it thickens and coats the back of a spoon.
Return the onions and pears to the glaze and simmer, stirring gently, for 5 minutes.
Let cool to room temperature before serving with the cheesecake.


The best part?
There's plenty left over for my lunches this week, and I will be eating it. Yes I will.


Monday, December 18, 2006

A Truffle-licious Christmas

Truffles seem to be the rage this holiday season, don't they? Everywhere I look, someone is making a batch to give as gifts or to bring to a party - and everywhere I look these people are posting pictures and oh my GAWD does it all look good!

When I asked our Christmas Eve dinner hosts if I could bring something and was asked in return what I'd like to bring, truffles were still on my mind. I offered to bring dessert (along with an appetizer and my Infamous Mashed Taters) with the idea to make some ostentatiously delicious truffles.

While I was at it, I decided to make some extras to bag up in these cute li'l cello bags with Santa on them to use as small thank-you gifts to some local businesses we frequent. Living in a small town like we do, one gets to know those they do business with on a regular basis.

I firmly believe you just can't go wrong when you turn to Jacques Torres for confectionery goodness.

Truffles by Jacques Torres
from Dessert Circus at Home
makes about 180 small truffles

18oz heavy cream
21oz bittersweet or dark chocolate, good quality (note: that new Nestle Chocolatier stuff? Yeah, thassgood.)

Chop chocolate into small bits with a large serrated knife. Place in a large bowl.
Over medium heat, gently warm the cream until small bubbles form around the edge
Pour half the hot cream over the chocolate and let it sit for 30 seconds. Using a whisk, stir until the chocolate begins to melt. Add the rest of the cream gradually, whisking to incorporate.

If you wish to flavor all or part of your ganache, do so now. You can use liqueurs or spirits like Grand Marnier, or you can use flavoring extracts like coconut or mint. Add the flavoring gradually to taste.

White Chocolate Truffles

6oz heavy cream
16oz white chocolate, chopped fine

Repeat above process to make the white chocolate ganache.


Pour warm ganache into a half sheet pan, a 13x9 baking pan, or other relatively flat container. Chill in the refrigerator about 1 hour, or until firm.

Meanwhile, prepare baking sheets or half sheet pans by lining with parchment paper, wax paper, or silicone baking mats.

When the ganache is firm, use a melon baller or a teaspoon to portion the chocolate onto the prepared pans. Don't worry about making them look pretty; you can do that later.
Alternately, you can pull the ganache a little sooner, when it's of toothpaste consistency, and use a piping bag fitted with a large round tip (Wilton 1A or 2A). Pipe small dollops onto prepared pans.
Chill ganache again for at least 1 hour, or until the chocolate lumps are firm.

Once the chocolate is firm again, quickly roll each into a ball using your hands and then roll in your desired coating.

Store covered in the refrigerator for up to 3 weeks, though they won't last that long.

Possible coatings

About the only limit is your imagination! You can use:
Cocoa powder
Confectioner's sugar
Finely chopped nuts
Coconut - toasted or untoasted
Crushed hard candies
Ground spices ("mellow" them out with confectioner's sugar or cornstarch)


I made two recipes of the plain chocolate and 1/2 recipe of the white chocolate and turned them all into 6 different types of truffle.

Bittersweet chocolate coated in cocoa powder
Bittersweet chocolate flavored with coconut, coated in crushed macadamia nuts
Bittersweet chocolate coated in toasted crushed almonds
White chocolate coated in crushed candy canes
Bittersweet chocolate coated in honey dust
Bittersweet chocolate half-coated in crushed toasted almonds and half dipped in white chocolate, with a sprinkle of fleur de sel.

Friday, December 15, 2006

The Zen of Sourdough

Mark Bittman's "No Knead Bread" is lighting a strange sort of fire under the buns of cooks the world over. It's kind of creepy, how this technique is spreading like a pandemic, but I understand why.

How long have we been subsisting on a diet of squishy, bland, overprocessed Wonder bread and its ilk? Pre-sliced, pre-packaged bread became the norm in the 20s and 30s thanks to Wonder Bread, and as supermarkets started to dot the country the average American grew lost to the art of breadmaking.

Bread as food is almost archetypal in the consciousness of humanity. We've been eating it for millenia. In fact, the cultivation of grain is widely considered to be the driving force behind homo sapiens' gradual transition from nomadic hunter-gatherers to settled colonists some 10,000 years ago. Bread is why we are who we are now.

In terms of breadmaking, the process itself hasn't changed too terribly much over the ages. Grains were ground fine, they were mixed with liquid and some sort of leavening, or rising, agent, and they were heated until cooked. These ancient peoples had to work a little harder for their leavening, though; the dough would be left to "rest" for several hours or more to allow wild yeast to take hold and raise the bread. Later, bakers discovered that the byproducts of beer- and winemaking produced an even lighter, fluffier loaf when used in their breads .

Today's breads are made with the same principles. True sourdoughs and other breads like Ethopia's flatbread Injera are allowed to ferment for several days in order to attract and cultivate the wild yeast that leavens the bread to varying degrees. Other breads are made with commercial packaged yeast - a different strain than the barm ancient bakers got from their brewer neighbors, but packaged and ready-to-go yeast nonetheless.

Sourdough bread. We think San Francisco when we think of sourdough bread today, but its history dates back to ancient Egypt. Bakers would reserve a piece of dough from the day's breadmaking to use in the next day's loaves. That piece of dough is essentially identical to today's sourdough starters - the carefully nurtured batter that gives sourdough its characteristic "tang" thanks to the inclusion of harmless, but tasty, bacteria that ride along with the yeast.

Making and maintaining a sourdough starter, much like breadmaking itself, is a labor of love. It's kind of like a pet that isn't fuzzy and doesn't cuddle up to you while you watch TV. It just sits there, smelling funny, waiting for you to feed and coddle it.


Sourdough Starter
1 cup flour
1 cup water
1 T sugar or honey
1 small piece of apple or 1 grape

note: Do not use metal containers or utensils when working with your starter.

Place the above ingredients in a glass, ceramic, or plastic container. Mix well using a plastic or wooden spoon until it forms a thick batter.
Cover with a clean cotton towel and place in a warm spot, preferably on a windowsill with the window cracked open.
After 24 hours, remove 1 cup of the batter and add 1/2 cup flour and 1/2 cup water. Mix well. This is called "feeding" your starter.
Let it sit another 24 hours, and repeat the feeding process.
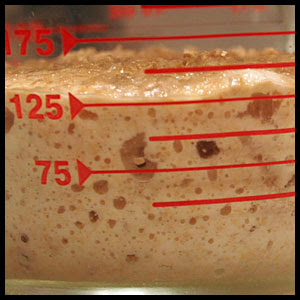
Continue feeding your starter every 24 hours until it has a nice, sticky, bubbly froth over top and bubbles throughout. It will also smell sorta soury-beery. It may take 3 days, it make take over a week. This depends on the yeast in your locale, the conditions in your windowsill (or wherever your starter lives), or perhaps the price of silver. A sourdough starter is a highly personalized thing and each one is different.
And if you're sitting there after 10 days with a stinky, non-bubbly mess...well, that's okay. The temperature may have been too cold, who knows. Occasionally it just doesn't work. Try again, and if it still doesn't work then the wild yeast in your locale might be a bit sluggish. Start the process again, but this time add a pinch of packaged yeast to the batter. That'll kickstart the process and give your wild yeast a nice happy home to move in to.

Caring for your starter

Okay, this is the cool part. Once you've gone through all that to get a working starter, you really only have to worry about it about once a week afterwards! Switch that cotton towel out with a loose fitting lid and store your starter in the refrigerator. I like to use the plastic 2 quart drink pitchers with a pouring spout that you can get at any discount store; they're plastic, they're cheap, the lid is perfect, and it has a freakin' spout for pouring!
note: a pungent, straw- or brown-colored liquid will appear on top of your starter. That's supposed to happen. This is called hooch; just stir it back into your starter.
Once a week, remove 1 cup of starter and replace it with 1/2 cup of flour and 1/2 cup of water. Let it sit in a warm spot for 24 hours and return it to the fridge. That's all there is to it! You can make bread now.

Kept properly and fed regularly, a sourdough starter will literally last forever. Some bakeries use starters that were first created more than a hundred years ago!


Breadmaking is a very Zen experience. Many people today shy away from it because they think it's difficult, or because they think it just takes too darn long. I used to think that too, and resorted to paying $5 a loaf for "fancy" bread that tasted significantly better than Wonder Bread, but generally nowhere near as good as I now know the homemade stuff tastes.

Here's a secret: making bread is not difficult, and your actual interaction with the pre-baked product is maybe 20 minutes or so. When your bread is rising, you don't have to do anything with it. Hell, you don't even have to be home. Mix everything up, and go take a bath or clean the house or get your nails done. It'll be just fine.

"But...but...I have to go to my kid's school play which will take two hours, and my dough is only supposed to rise 1 hour!"
That's okay. Bread will work around your schedule. Here are the two big rules about bread:
1) Sweetening agents and/or heat will make the yeast work faster
2) Salt and/or cool temperatures will slow the yeast way down
The faster yeast work, the quicker your bread rises. The slower they work, the slower your bread rises. Mix and knead your dough and stick it in the fridge overnight to bake the next day. It's all good. Hold it in the fridge while you're at the school play and take it out when you get home. It'll be fine.
In fact, most breads, sourdough or not, have a better flavor if you let them rise in the refrigerator for a long period of time! The slow rise allows for some friendly bacteria to hang out with the yeast, and those bacteria taste good! You just let the bread do its thing, and it'll let you do your thing.
It's chill like that.

And no, it's not difficult to mix and knead bread. Modern conveniences like a stand mixer make the process a bit quicker, but you don't need one to turn out loaves that'll make the bakery at your local grocery weep jealously. All you really need is a sturdy wooden spoon and about 10 minutes worth of elbow grease.

I actually like to get down and dirty with a blob of bread dough. It's vaguely meditative, actually. You don't need to think about what you're doing, you just let your hands work the dough while you ponder world peace, the meaning of life, or what the heck happened on the last episode of Heroes.
Push. Fold. Pull. Turn. Push. Fold. Pull. Turn.
Ten minutes later, you have bread dough along with enlightenment.
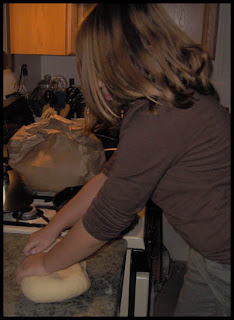
No excuses allowed, unless you like don't have any hands or something. My six year old stepdaughter can knead a batch of dough that turns out two large loaves. She has to stand on a chair to reach it, too.

If a six year old can make bread and make it well, then you can too. You wouldn't want to be upstaged by a six year old, would you?

You'll notice that Munchkin is up high enough to exert a good amount of downward pressure on the dough. Let gravity do some of the work for you in the kneading process; get that dough on a slightly lower surface and your hands won't tire like they will if you knead on your normal work surface. You've got bodyweight on your side now.


Sourdough Bread

1 cup starter
1 1/2 cups bread flour
1 1/2 cups warm water
1 T sugar or honey
Mix the above well in your mixing bowl. Let it sit, covered, at room temperature until the mixture bubbles and froths, or for up to 10 hours. This is called a sponge.
(you can do this before bed, then mix the dough before work, and have fresh bread for dinner that night!)

To your sponge, add:
1 stick (8 T) unsalted butter, melted
1 T salt
4 cups bread flour

Mix well with a spoon or with the dough hook attachment of your stand mixer. Watch the consistency of the dough; you want a soft, slightly sticky dough that easily comes together in a ball (and will cling to your dough hook if using a mixer). If the dough is too sticky, add more flour 1 T at a time. If it's too dry or stiff, add more water 1 T at a time. The dough is done when it's soft, springy, and a bit sticky.

Knead the dough by hand for 10 minutes, or by machine for 5 minutes. It will lose its stickiness and will become supple and smooth, almost like a baby's bottom.
Transfer the dough to a lightly greased bowl and cover with plastic wrap or a clean cotton towel. Let rise at room temperature for about 1 hour, or until doubled in bulk. You can also pop the covered bowl in your refrigerator and let it rise there for 8-10 hours.

Punch the dough down by gently smooshing your fists into it.
Divide in half and shape into two loaves - either into log shapes to fit bread pans or free-form oval loaves.
Cover and let rise about 45 minutes, or until doubled in bulk.

Preheat oven to 350*
When the loaves have risen, use a sharp knife or a razor blade to make 1/4" to 1/2" deep slashes across the tops. There are several "designs" you can use when slashing your bread, but with loaf shapes the most common is one long vertical slash, or 3 or 4 slightly diagonal ones. This gives the bread more room to expand in the oven, and it looks pretty cool too.
Brush with an egg wash or some melted butter. (for this recipe, I like to brush with melted butter and top with a sprinkle of kosher salt)
Bake for 25-30 minutes, or until the loaves sound hollow when tapped.

Cool on a wire rack and enjoy!

Don't forget to replace the part of your starter you used by adding 1/2 cup flour and 1/2 cup water. Let it sit out for 24 hours before returning it to your refrigerator.


Thursday, December 14, 2006

Pumpkin Threeway

What's better than pumpkin when the weather cools?
Pumpkin and its squash cousins just taste like fall and winter. There's no rhyme or reason to it; when most of us think pumpkin, we think crisp nights and the smell of snow in the air.

Unfortunately when most people think pumpkin, they also think pumpkin pie. Don't get me wrong; I love me some pumpkin pie, but it seems only a small minority of the population realize that pumpkin is so much more than pie.

Three versatile recipes follow, from breakfast to dinner, from entree to dessert.

The most telling example I have of "Ew, pumpkin what??" is my favorite non-pie pumpkin application.
A couple Thanksgivings ago, my mom made a pumpkin roll to serve with dessert. The recipe called for around a cup of pumpkin, and she had purchased one of those big 30-some oz cans of the stuff. There was a LOT of leftover pumpkin that she didn't want to see wasted...so I said I'd come up with something.
I was already working on a couple other dishes and we had a full menu planned, so I wanted simple and somewhat unassuming. What to do, what to do? Why, we had no soup on our menu! I remembered seeing recipes for pumpkin soup somewhere along the line, but I couldn't remember any of the important details - including what goes in pumpkin soup other than pumpkin.
Not one to let something so trivial stop me, I threw together what I thought would be tasty. Come time for dinner, I ladled that soup out and proudly served it to my perplexed and mildly horrified family. They all stared at their bowls with more than a little trepidation, and as spoons slowly went from bowl to mouth I could tell they were only trying it to be polite and fully expected to discreetly move on to the "normal" food after one bite.
Since I don't serve food that I haven't tasted, I already knew it was good. In fact, I was halfway through my bowl before anyone else had worked up the nerve to try the stuff. From the corner of my eye, I saw the surprise register on everyone's faces as they tasted, and before long the soup was gone.
My recipe has evolved since that first foray, but it remains simple and fuss-free.

Pumpkin Soup

Makes 6-8 appetizer or side dish sized servings

24oz pumpkin, pureed (roasted and pureed raw pumpkin, or canned pure pumpkin)
36oz chicken or vegetable stock
1 medium white onion, small dice
1/2 green apple, grated
1 T brown sugar
Heavy cream
Dry mustard, nutmeg, curry powder, salt & pepper
Green onions to garnish

In a stockpot, saute the onion in a bit of butter or oil over medium heat until translucent.
Add the stock and the pumpkin and allow to come up to temperature, whisking well to combine.
Add the grated apple and mix well.
Add 1 teaspoon curry powder, 2 teaspoons dry mustard, brown sugar, and 1/2 teaspoon nutmeg. Whisk well and then let it simmer for 15-20 minutes.
Season to taste with salt & pepper.
Slowwwwwllly add heavy cream, whisking the entire time, until you achieve your desired consistency and creaminess.
Taste and adjust for seasoning again.

To serve:
Ladle into ramekins or small soup bowls. Top with a sprinkle of nutmeg and some sliced green onion.


Pumpkin Muffins from Cooking Debauchery

Next in line of my favorite pumpkin recipes is a recent discovery from the ever-incredible Kitarra over at Cooking Debauchery.
Oh holy hell, these muffiny-cupcakey things are amazing.

I made a few adjustments to her recipe based on, of course, personal taste and what I had on hand; the most drastic change was omitting the fruit.
I went with:

Muffins:
1 1/2 cups AP flour
1 t salt
1 cup packed brown sugar
1 t baking soda
1 cup pumpkin puree
1/2 cup canola oil
2 eggs, beaten
1/4 cup skim milk
1/2 t ground ginger
1 t cinnamon (maybe more...we like cinnamon)
1 T vanilla

Filling:
1 8oz brick of cream cheese
1 t cinnamon
1 t vanilla
3 T brown sugar

I prepared it as directed in the original recipe. As mentioned there, overmixing the batter will give you rubbery, dense muffins. Use a gentle hand and mix only until the dry ingredients are moistened.

My favorite part of these muffins is how easily they transition to a simple dessert. They're awesome with your morning tea/coffee, but they're also just sweet enough to cap off a hearty dinner.
Let's not mention that picky children will happily eat some pumpkin if they think it's a cupcake, too. There's enough wiggle room in this recipe that you can easily make them low fat (sub out some of the oil with applesauce...yum!), and between the vitamin A and fiber pumpkin carries, your kids won't know they're eating something healthy.


Next up is another mishmash recipe that I cobbled together from various other recipes and ideas.

Pumpkin....and pasta. Together. In the same dish.

Pasta with Sausage and Pumpkin Alfredo Cream

Makes: 4 entree servings

1lb pasta, cooked and drained
1lb sweet or hot Italian sausage (bulk, or casings removed)
1 cup pumpkin puree
1 cup chicken or vegetable stock, plus more as needed
1 cup white wine
2 T butter
1/4 cup Parmesan cheese, grated
1/2 cup heavy cream
Small handful of sage leaves, chiffonade
Half a handful of basil leaves, chiffonade
Nutmeg, salt & pepper

Brown the sausage and drain well. Remove to a bowl.
Deglaze the skillet with wine, then whisk in pumpkin, stock, butter, and a pinch of salt over medium heat. Simmer for 10 minutes.
Whisk in the heavy cream and bring up to heat. Add the Parmesan and whisk gently until combined. Simmer for 5 minutes, until thickened. If sauce is too thick for your liking, add a bit of stock until it reaches the consistency you like.
Add sausage and simmer for 5 more minutes.
Season to taste with salt and pepper. Add 2 pinches of ground nutmeg.
Just before serving, add sage and basil and mix well. Add salt or pepper as needed.

Serve over pasta.

Wednesday, December 13, 2006

Meatloaf, smeatloaf, double beatloaf. I hate meatloaf.

Oh, how I've hated meatloaf. It induces a reaction very much like Randy's in A Christmas Story. I don't recall a time that I ever actually liked the stuff. Dry, bland, and invariably soaked in a river of ketchup in a vain attempt to give it some sort of "oomph" is generally not my idea of palatable food.

To my chagrin, Kevin loves meatloaf. If he can't decide on something from the menu, I tell him to get the meatloaf and he does, and he's happy.

Then I found recipes for...Crockpot meatloaf. It piqued my interest, and I set out to make a surprise treat for my dear meatloaf-loving better half.

My first problem with meatloaf was always how dry it usually is. But if I were to cook it carefully in a Crockpot, I could probably retain a good amount of moisture. There may not be any need for gravy or ketchup!
As to the second problem - the bland flavor - it could also be easily remedied with judicious use of cooking liquid and some creative spice usage.

Hot damn, I may be on to something here!

Having never made meatloaf before (seriously.), I recalled a Good Eats episode where my venerated Alton Brown addressed just this issue, and I hastened to dig up his recipe. I now had a handful of existing recipes and a different cooking method to work with.

I picked bits and pieces from the different recipes and adjusted for what I had on hand. Then, since this was meant to be a special treat for Kevin, I included some of his favorite flavors (namely, the mustard). When all was said and done, I came up with....

Not Your Mama's Meatloaf

Makes 1 large meatloaf
Special equipment: a 5qt or larger Crockpot, Vegeta seasoning mix, heavy-duty aluminum foil
Note: plan ahead for a cooking time of 12 or more hours!

2.5lbs ground chuck
2 eggs, lightly beaten
1 medium onion, minced or shredded
Store-bought Ceasar seasoned croutons, pulverized
3 beef bullion cubes dissolved in 1 cup of hot water
2 cloves garlic, crushed (or more to taste)
Yellow mustard
A-1 sauce
1 cup shredded cheddar cheese
Vegeta seasoning mix, dry mustard, thyme, kosher salt, pepper
Red wine vinegar

Prepare the Crockpot:
Take a length of foil and crumple it loosely. Place it in the bottom of the Crockpot. This will keep the meatloaf from sitting in the cooking liquid and cooked-out fat and getting soggy.
Take another length of foil, about 30" long. Fold it in half lengthwise and tuck it in the Crockpot so the two ends stick out and form the "handles" you'll later use to move the meatloaf around.

All mixing is done with your hands. Don't squeeze or handle the mixture roughly. Be gentle!
Place beef in a very large bowl and add the eggs and onion. Mix well with your hands, using a light touch. Add the pulverized croutons a bit at a time until the mixture easily comes together in a ball.
Add a healthy squirt of yellow mustard, probably about 3 tablespoons' worth. Add a shot of A-1 sauce. Add the garlic. Mix well.
Add 1 tablespoon of Vegeta, 1 teaspoon of thyme, 1 teaspoon of dry mustard, and salt and pepper to taste. Mix well.
Now is the time to make your final adjustments for consistency. If the mixture is very wet and loose, add more pulverized croutons. If it's dry and crumbly, add some of the beef bullion water.

Remove your foil "sling" from the Crockpot.
Divide the mixture in half. On the piece of foil, form the first half into a flat round or oval shape that will fit your Crockpot.
Place 1 cup of shredded cheddar on the mixture, staying within 1/2" from the edges. Don't be afraid to mound it up tall!
Carefully shape the rest of the mixture over top of the cheese, being sure to seal the seam.

Use the foil "sling" to place the meatloaf in your Crockpot, placing it directly on top of the crumpled foil you put in the bottom earlier.
Pour a shot of red wine vinegar on the meatloaf, then carefully add the remaining beef bullion water to the bottom of the Crockpot. Fold the foil "handles" down over the top and pop the lid on.
Cook on low heat for 12-14 hours, or until a meat thermometer reads 165*.

Yes, I know it's an awkward cooking time. You could let it go overnight, which is what I did, then stick it in the fridge and reheat in the oven before dinner.


And thus has ended my 30 year hatred of meatloaf.
As we ate, I asked Kevin what he thought of it, and he glowered at me. "I can't talk now, can't you see I'm stuffing my face??"

Gadgets & Gizmos


I'm remarkably easy to shop for come gift-giving time. My mom even commented on it with Christmas fast approaching; when in doubt, just give Chellie something for the kitchen. That's all I need to make me happy, really.

Indeed, I'm a gadget freak.

I'm very quickly running out of shelf, counter, drawer and cabinet space here, and I can't seem to stop.

I don't want to stop!

I do have some essentials, however...


Kitchenaid Stand Mixer - This is my end-all, be-all of kitchen gadgets and gizmos. I don't know how I survived without one, and I don't know that I'd be able to function if some nefarious culinary thief crept into our kitchen late at night and stole ours. Our workhorse - which I've named Julia - gets near daily use and often multiple spins in a single 24 hour period. It kneads my bread dough, it mixes my batters, it whips eggs, and damned if it doesn't sit there and make my kitchen look cooler. I don't even have a single attachment for it (yet!!) and it's my most-used appliance.

Immersion Blender - Soups, sauces, small food processing jobs; this baby gets almost as much use as the Kitchenaid. And it's multiple gadgets in one! I always forget how powerful it is. I remember when I'm not careful and I splatter soup all over the stove when I get too enthusiastic in my immersion blending.

Crockpot - Don't think of it as the thing your mother switched on in the morning so she wouldn't have to cook dinner when she got home in the evening. Think of it as a vehicle for the best meatloaf, chili, stew, pulled pork, bread pudding, beans, and hearty soup you'll ever have. I love my Crockpot and once the weather cools, as it has now, it gets a real workout.

Wooden Spoons - I love wooden spoons. I can never have enough wooden spoons in all shapes and sizes. My family once collectively gifted me with about 50 wooden spoons and it was one of the greatest gifts ever.

Silicone Spatulas - Much like wooden spoons, these things are amazingly versatile. They don't melt or warp, they're soft enough for delicate sauces but sturdy enough to scrape out that last bit of cake batter, and nothing sticks to them!

Silpats/Silicone Mats - Your baked goods will never stick again. Ever. You should already have a couple of these in your kitchen.

Pepper Mill - I called my mom a heathen last Thanksgiving while we were preparing dinner and I discovered she only had that awful, tasteless pre-ground pepper. Yuck. We had to go get one of those one use disposable pepper mills just so I could impart the peppery goodness to our Thanksgiving dinner. Seriously, who can eat that awful pre-ground stuff?? Let's just say her Christmas present last year was fairly obvious: she got a giant 2 foot tall pepper mill.

Cast Iron - Whether it's a gadget or not, a heavy, well-seasoned cast iron skillet is one of my essentials. From grilled cheese to steaks & burgers to the perfect batch of caramelized onions, you cannot go wrong with cast iron.

Your Perfect Knife - Every cook, beginner to pro, should have at least one knife that feels like an extension of their own hand. Wüsthof 's 7" Santoku is mine, but it's different for everyone. Kevin likes his gigantic 10" Chef knife, however it's far too unwieldy for me to use safely. Visit a knife store in your area and find your perfect knife! You'll know it when you hold it.

Unglazed Quarry Tiles - Forget spending $30 on some cheap pizza stone. Forget uneven heating in your oven. Head to Home Depot and grab a box of unglazed quarry tiles for like $5, and you'll have enough to line the bottom of your oven 5 or 6 times over. They distribute heat evenly and turn out the most amazing bread and pizza. Just make sure to get unglazed so no yuckies seep into your food.

Kitchen Scale - From weighing flour to portioning things, my kitchen scale is always close at hand. Admittedly, I use the scale almost exclusively for breadmaking, but I still consider it an essential in my kitchen.

Meat Thermometer - Because it's the only way to really know that your turkey is done. Or your meatloaf. Or your chicken.

Pyrex - More for cooking than baking, I love my Pyrex. Every kitchen should have at least a starter set of Pyrex containers because they're just about as versatile as a wooden spoon.

Potato Masher - It's the only thing I use to make mash. End of story.

Mortar & Pestle - Again with the old school. What can I say? There's something viscerally satisfying about bashing the hell out of your food. Aside from that, you'll not get a better rough crack on peppercorns from anything else.

Piping Bags & Tips - Cake decorating may be my newest hobby, but a decent set of decorating tips comes in handy for so much more than pretty buttercream. Whipped shortbread cookies go from blah to better-than-store bought with a squeeze, deviled eggs never looked nicer, and cupcake frosting just got a whole lot more interesting.

Tuesday, December 12, 2006

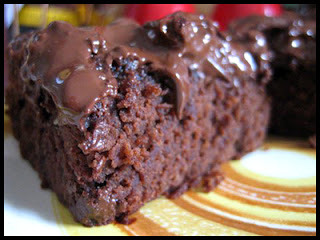
The only brownie recipe you'll ever need

Attn dieters: STAY FAR AWAY!!!

Much like the Infamous Mashed Taters, these brownies are a special occasion food.

This is a slightly modified version of Alton Brown's brownie recipe (all hail Alton!). In my eyes, Mr. Brown can do no wrong, but sometimes my personal tastes dictate some minor deviation from his gospel of food.
Not only are these amazingly delicious, but you probably have everything you need to make them in your kitchen right now.

Rich Fudgy Brownies

8 large eggs
2 cups sugar
2 cups brown sugar, packed
1lb butter, melted
2 1/2 cups cocoa powder (like Hershey's)
1 1/2 T pure vanilla extract
1 cup all purpose flour
2 t kosher salt
1 T cinnamon

Dark chocolate chips (like Hershey's Special Dark or Ghirardelli Dark)
Chopped nuts - optional

Butter and flour a 13x9 pan. Preheat oven to 300*.

In a large bowl, sift together the flour, cocoa powder, and cinnamon.
Whip the eggs until fluffy and light yellow. Add both sugars and beat until creamy.
Add the melted butter, salt, and vanilla and blend well.
Add the dry ingredients slowly, mixing well between each addition. When all the dry ingredients have been added, continue to mix for a minute or two until the batter is smooth and thick.

Pour batter into the prepared baking pan. Liberally sprinkle chocolate chips over the entire top of the batter to cover.
If using nuts, sprinkle the chopped nut of your choice on with the chocolate chips.

Bake at 300* for 60-75 minutes, or until a toothpick inserted in the center comes out with moist crumbs sticking to it. Watch carefully, as you don't want these to overbake - and they're overbaked if your toothpick comes out clean

Let cool 30 minutes or so before you try to cut them.


If you like a no muss, no fuss brownie that's moist, dense, rich, and incredibly chocolatey, then this is the brownie for you. The flour is almost an afterthought, just enough there to hold things together. There's nothing extraneous here - just chocolate with a hint of cinnamon to deepen the flavor.

Infamous Mashed Taters

I call these "infamous" because you will become the thing of legend in your family when you serve them. Bring them to a potluck and you'll never be asked to bring anything but these again. You will be worshiped for your amazing potato skills.

One word of caution: treat these as a "special occasion food." Save them for holidays and such, because if you try to eat them more often than a few times a year you will fall over and die from clogged arteries. These are NOT healthy!


Infamous Mashed Taters

5lbs of Yukon Gold or other yellow potato
1/2 lb butter, cubed
Many, many cloves of minced garlic
8oz brick of cream cheese, cubed
Heavy cream
Salt and pepper

Equipment: large stock pot, old school potato masher

Prep the potatoes:
If you like texture in your mash, partially peel the potatoes. If you're a wuss and don't want any skins in your mash, peel them completely. You wuss.
Cut potatoes into relatively equal pieces and place in a large stock pot. Cover with cold water and add 2 tablespoons of salt.
Bring water to a boil and let it go until you can easily slide a fork into a potato piece.
Drain carefully.

Leave the potatoes in the stock pot and add the butter. Use the hand masher to smush everything up a bit; the butter will melt very quickly. Repeat the process with the cream cheese.
Next, slowly add the heavy cream a bit at a time, mash-mixing in between additions, until you reach a slightly thicker consistency than you'd like.

Now we will season!
I'm a huge fan of those big ol' jars of pre-minced garlic. Purists may laugh, but in hot dishes you really can't tell the difference. Start adding garlic to the potatoes. I use a tea spoon at a time right from the jar, mix-mashing and tasting between additions, until it's as garlicky as I want it to be. Do the same.
Next add salt and pepper. Kosher salt and fresh ground pepper is best, and I recommend you use those. Like the garlic, this is based on personal taste so work a bit at a time.

When your potatoes are garlicked, salted and peppered to your preferred levels, add any additional heavy cream to thin the mash out. Again, this is to your preference so add until it's how you like it!
Mix-mash until everything is as smooth or lumpy as you want it, and serve immediately.

I like lumps, I like skins, I like a LOT of garlic, and I love plenty of pepper.

One more thing.....if I hear about anyone using a hand mixer or a food mill or anything but an old school potato masher on these, I will remove my recipe from your possession. These are rustic, rich, indulgent mounds of love and they are not to be trifled with.

Roasted chicken with mango salsa

Okay, I admit...this is a summer meal. It turned out so well that I'm perfectly willing to dig up the photos months later.

Don't let the winter months stop you, though. If you can find tasty mangoes, go for it! The flavors may just find you thinking of warm summer evenings even as snow falls outside.


Roasted chicken

1 whole chicken
1 fennel
3-4 lemons, quartered and zested
1 onion
Fresh Italian parsley
Butter, salt & pepper

Start the evening off by preheating the oven to 475*.
Take the chicken and stuff it with some quarted lemons and half the bulb of the fennel, quartered.
Next, use your fingers to loosen the skin over the breast of the bird. Take some of the fennel fronds, some of the parsley, and a bit of lemon zest and stuff it under the skin.
Put it all in a baking dish and pour melted butter over Mr. Chicken.
Add a healthy few sprinkles of kosher salt and some fresh cracked pepper.
Add some more quartered lemons, the green stalks of the fennel, and a rough chopped onion to the dish.

Bake at 475* for 20 minutes, or until the chicken is nicely browned.
Lower the temperature to 350* and cook until a meat thermometer reads 165* at the thigh.


Mango Salsa


2-3 ripe mangoes, diced
1/2 small red onion, diced
Fresh cilantro, chiffonade
Olive oil
Cumin
Salt and pepper

Mix the mangoes, onion, and cilantro together. Drizzle with olive oil until moistened.
Season to taste with cumin, salt & pepper.
Refrigerate for at least 1 hour (or overnight) to mingle the flavors


Serve the chicken either halved or quartered, depending on your appetite.
We like chicken, so I serve it halved.

Accompany this with fresh seasonal vegetables of your choice. I used some amazingly sweet corn on the cob, and included a generous dallop of my infamous 'mashed taters' on the side.

Pain au chocolat


I don't believe in taking things slow. After never having baked anything more complicated than chocolate chip cookies my whole life, I cranked out a few loaves of bread to great success.

That was way too easy, I thought. I needed a challenge. And I needed chocolate.


I recalled a conversation I'd had with Beth where we were discussing, of all things, baking. She commented that she hadn't yet worked up the gumption to try her hand at croissant because it was so complicated. Now, she certainly didn't intend the comment to be a challenge, but I took it as one to challenge myself.

Could I make croissant?
Jacque Torres made it sound fairly doable...and even explained how to make the divine pain au chocolat, which would certainly take care of my chocolate cravings.
I decided to dive in.

Pain au chocolat
Makes 16 pastries

Dough:
3 tablespoons butter
1 tablespoon + 1 teaspoon dry active yeast
generous 1/2 cup cold water
3 1/3 cup bread flour, plus more as needed
2 teaspoon salt
1/3 cup sugar
generous 1/2 cup whole milk

1/2 lb + 2 tablespoons butter, softened at room temperature to spreadable consistency

Filling:
~9oz bittersweet or dark chocolate - GOOD QUALITY - use chips or chop up bar chocolate

Egg wash:
2 large egg yolks
1 large whole egg
scant 1/4 cup whole milk
scant 1 tablespoon sugar

Several hours before you start, take the large quantity of butter out of the fridge and place in a bowl to soften. It should be of spreading consistency when you start the dough.

Melt 3 tablespoons butter and allow to cool to room temperature. It should still be pourable, but not hot.
In a small bowl, dissolve the yeast in the cold water.
Place the flour, salt, sugar, milk, and melted butter in the bowl of a stand mixer fitted with the dough hook attachment. On medium speed, mix until the ingredients are just dispersed.
Add the dissolved yeast and mix at medium-high speed for 2 minutes, or until dough begins to form and pulls away from side of the bowl.
Check the consistency of your dough. If it's very sticky, add more flour 1 tablespoon at a time. If it's very dry and stiff, add milk 1 tablespoon at a time.
The dough is ready when it's soft, springy, clings to the dough hook in a ball, and is only a tiny bit sticky. Add flour or milk until you hit that point. (I had to add almost 2/3 cup more flour to get it right)
Remove the dough hook and scrape dough off it with floured hands.
Sprinkle about 1 tablespoon of flour over dough in the mixing bowl and use your hands to gently form it into a ball, turning to coat the whole thing lightly in flour.
Cover with plastic wrap or a tea towel and let the dough proof for 30 minutes.

Remove dough to your work surface. You can either lightly flour your counter or wherever you normally work, but what I did was take a length of parchment paper, 15" wide by about 36" long and lay it out over my surface.
Knead the dough gently a few times. If it's sticking badly to your hands, incorporate a bit more flour into it.
Roll the dough into an 8" x 15" rectangle about 1/4" thick. This is where that parchment paper came in handy, for measuring purposes as well as easy mess cleanup!
Wrap the dough in parchment paper or plastic wrap, place on a baking sheet or some other hard surface, and refrigerate for 1 hour.

Remove dough from the refrigerator and return to your work surface. Bring the softened butter! If you're using the parchment paper method, you just need to unwrap and go. Otherwise, lightly flour your work surface again.
Lay the dough so the long side faces you. Spread the butter over the right 2/3 of the dough. I found a silicone spatula to work well for this, but it's going to be messy regardless.
Fold the (butterless) left third of the dough over the center, then fold the right third of the dough to the left. Now it should resemble a folded letter. This is called a "single fold."
Roll this out into another 10" x 30" rectangle about 1/8" thick.
Give the dough a book fold, or double fold, by folding each short end to the middle so they meet but do not overlap. Then fold one half over the other half like you're closing a book. Jacques may balk at me doing this, but the parchment paper makes some of the folding much easier, and your hot hands don't have to touch the dough as often, thus there's less butter melting.
Re-wrap the dough, put it back on your baking sheet, and chill in the refrigerator for at least 1 hour.

At this point, you can leave the dough in the refrigerator overnight and finish the pastries the next morning if you want.

Remove dough to your work surface again - either parchment paper lined or lightly floured.
Roll into another 10" x 30" rectangle and turn it so the long side faces you.
Give the dough a single fold by folding the left third of the dough over the center. Then fold the right third of the dough to the left.
Re-wrap the dough and put it in the fridge for 30 minutes for its final chill.

Prepare 2 baking sheets by lining with parchment paper or silicone baking mats.

Remove the dough to your work surface once again, and this time roll it into a 10" x 36" rectangle about 1/4" or so thick. Try to keep it looking as much like a rectangle as possible, as this will make slicing easier.

Get ready to work quickly!!!
With a sharp knife or a pizza cutter, slice the dough into 16 equal rectangles. I cut 4 even strips long-wise, then cut each of those into 4 equal rectangles.
Lay each rectangle on your work surface, with the long side facing you, and place about 1/2 tablespoon of the chocolate in the upper third of each one. Fold that third of the dough over the chocolate. Place about another 1/2 tablespoon of the chocolate along one seam of the folded dough. Fold the bottom third of the dough over the chocolate.

At this stage, they can be frozen for up to one week if well wrapped in plastic wrap. Thaw on a parchment paper-covered baking sheet overnight in the refrigerator before proceeding.

Turn over the pastries so the seams face down. This will keep them from opening as they bake. Place them on your prepared baking sheet. They'll get bigger as they proof and bake, so space them about 2 inches apart.
When you've formed all 16 pastries, loosely cover the baking sheets with plastic wrap or floured tea towels and let the pastries proof at room temperature until they've doubled in size and look all airy and poofy: 1-2 hours.

Preheat the oven to 400 degrees and prepare the egg wash by whisking the ingredients above together well.
When the pastries are doubled in size, gently brush the egg wash over them to cover completely.

Bake for about 10 minutes at 400 degrees until golden brown and delicious. (mine took about 12 minutes)

They're best fresh from the oven - though let them cool for a few minutes so the chocolate doesn't burn your mouth! - but they're also delicious eaten at room temperature the next morning.

You can wrap any leftovers tightly in plastic wrap and freeze for about 2 weeks. Thaw at room temperature and warm in the oven if desired.

Welcome


She cooks! She bakes! She used to benchpress 250lbs before dislocating both shoulders!

I am Wondercook.

Well, actually, I'm Chellie, but Wondercook sounded kinda nice for that little intro bit there.
I really need to get some work done on this place, but while I take a break from that let me tell you a little about me and my food.

I didn't really start cooking until I was in my 20s. Sure, I'd puttered around in the kitchen before then, but it was infrequent and far from interesting. I used to find a recipe and follow it to the very letter, and that was never very fun for me. Food was a necessity of life, and the creation of it was merely a means to an end.

My outlook on food changed when I spent several years in North Carolina. Something about Southern food wormed its way into my soul, and for the first time I found joy in not only eating good food, but making it as well. Maybe all the butter and bacon greased up my culinary muse, but something happened to me in the Southland and I became obsessed.

Cooking became my secondary passion - trailing just barely behind my then-career as a professional wrestler. I learned how to throw out my recipes and to work with my senses instead. I never got into any concepts like fancy sauces or French words I could barely pronounce; I just made everything up as I went along. I was, and still am, an almost 100% improvisational cook.

The only downside to throwing away my recipes was the fear of baking I developed. Everyone knows that you have to Follow The Recipe when you bake, right? Horrible, terrible, disastrous things will happen if you don't! Ergo, my baking repertoire consisted of chocolate chip cookies and Rice Krispy treats. That's it. I wouldn't touch anything else with a 10 foot pole.

Somewhere along the way, serendipity struck in the form of a chef who thinks I'm pretty spiffy-keen. Insert your atypical boy-meets-girl, fall in love, happy cheerful hearts story here. The relevant part of the story, for BKI at least, is his occupation. A real, live chef - someone who loves food as much as I do!

My wrestling career came to an end thanks to post-concussion syndrome and I suddenly found myself with a whole lot of spare time on my hands. This is when my second food-transformation happened.

This is a household of carb-lovers. We love pasta. We love rice. We love potatoes.
And...
we
love
bread.
My dear friend Beth is a baker extraordinaire. After hearing her talk about all the wonderful, amazing breads she creates, I started to rethink my phobia of baking. I mean, she makes it all sound so easy! Maybe, just maybe I could manage to follow a simple bread recipe.

With much trepidation and crossing of fingers, I approached baking.
And after a couple weeks of playing around, I was kicking myself for having wasted almost 30 years of my life by not baking. (assuming an infant could bake...) You see, my 'playing around' uncovered a passion even greater than my passion for cooking: a passion for baking, and baking mostly bread. And not just a passion, but some weird sort of knack for the whole thing.
I went from zero to "Hi I made my own wild yeast sourdough starter!" in less than a month, much to the delight of my bread-loving hubby.

Now that the last barrier has been broken down, I'm balls-out in the kitchen. I don't care what it is, I'll try making it. Croissant? Yup, got that down pat. Brioche? Been there, done that. Fancy sauces? Definitely getting there.

Next I just need a creative outlet to share my foodie-ness with the world...how might I go about doing that....